
Walk-in showers have become the most requested bathroom upgrade we install in the Sacramento area. Whether you're converting an old tub-shower combo that nobody uses, updating a builder-grade stall, or designing a primary bathroom from scratch, a well-built walk-in shower can transform your daily routine and add real value to your home.
Over the past few years, we've seen a clear shift in what Sacramento homeowners want out of their bathrooms. The oversized soaking tub that dominated primary bathrooms in the 2000s and 2010s is being replaced by spacious, thoughtfully designed showers. It makes sense when you think about it. Most people shower every day but barely touch their tub. That six-foot bathtub is taking up valuable square footage that could become a shower you actually enjoy using.
This guide covers everything we talk to homeowners about during consultations: layout options that work for different bathroom sizes, tile materials and their trade-offs, the waterproofing that makes or breaks every shower, design features worth investing in, and honest cost ranges for the Sacramento market. We've installed hundreds of walk-in showers across Sacramento, Elk Grove, Roseville, and Folsom, and this is the advice we wish every homeowner had before starting their project.
Walk-In Shower Layout Options
The first decision you'll make is layout, and it depends heavily on your existing bathroom footprint. Sacramento has a wide range of housing stock—from 1950s ranch homes with compact bathrooms to newer builds in Natomas or Folsom with generous primary suites. Each calls for a different approach.
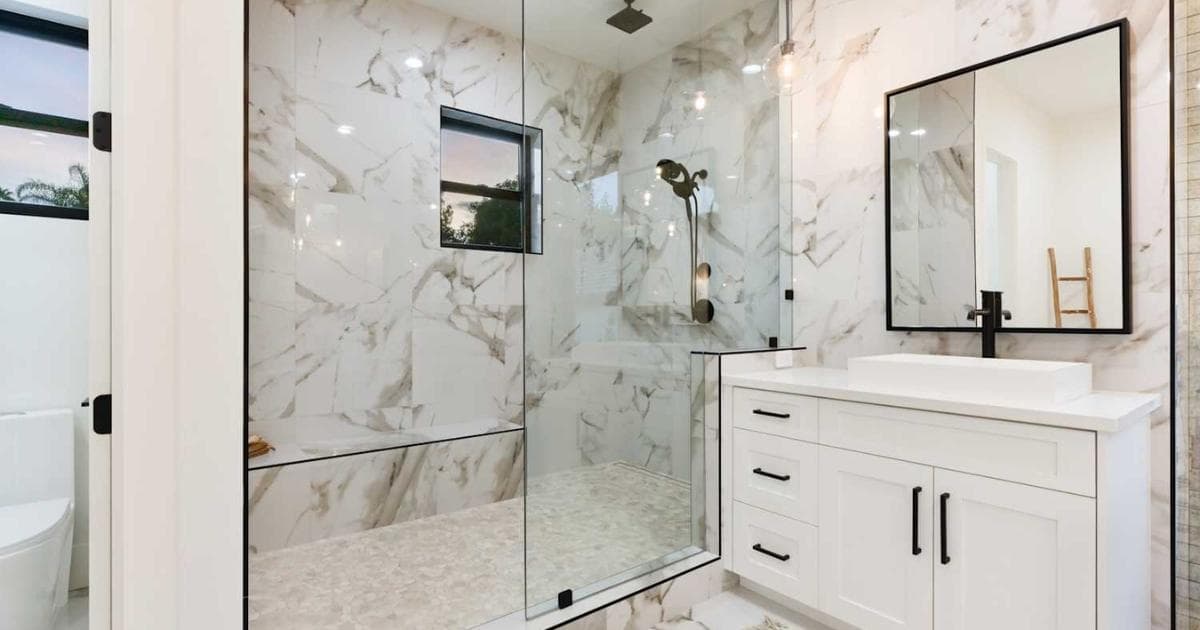
Alcove Walk-In Shower
This is the most common layout for Sacramento's older homes. The shower fits between three walls, typically where a tub-shower combo used to live. You're looking at a space that's usually 30 to 36 inches wide and 60 inches long—the standard bathtub footprint. The advantage is that you're working within the existing plumbing rough-in, which keeps costs down. The shower enclosure is completed with a glass door or panel on the open side. If your bathroom is on the smaller side, this is probably your best option, and it can still look beautiful with the right tile and glass.
Corner Shower
Corner showers use two walls and a glass enclosure on the remaining two sides. They work well in square or nearly square bathrooms where you want to maximize the open floor area. Neo-angle designs (with an angled glass panel across the corner) were popular for years, but we're seeing more homeowners go with a simple square or rectangular corner layout with frameless glass. These tend to feel more spacious and look cleaner.
Curbless (Barrier-Free) Shower
Curbless showers eliminate the raised threshold at the entry, creating a seamless transition from the bathroom floor into the shower. This is the design you see in high-end hotels and spa bathrooms, and it has become enormously popular. Beyond looking incredible, curbless showers are wheelchair-accessible and age-in-place friendly. In Sacramento's older slab-on-grade homes, going curbless can be more challenging because the drain needs to sit below the surrounding floor level, which sometimes means cutting into the slab. It's doable, but it adds complexity and cost. In newer homes with raised foundations or second-story bathrooms, it's generally straightforward.
Doorless Walk-In
If you have the space—typically at least 36 inches of entry width and a depth of at least 60 inches—a doorless walk-in eliminates glass doors entirely. You walk in through an opening, sometimes with a partial glass panel to contain splash. These showers feel luxurious and open, and they're easy to clean because there's no glass door to squeegee. The trade-off is that they require more square footage and careful design to keep water from escaping the shower area. A good tile installer will pitch the floor correctly and position the showerhead to minimize splash-out.
Tub-to-Shower Conversion
This is our single most popular project in Sacramento. The typical scenario: a homeowner has a 60-inch alcove with a dated tub-shower combo, and they want it converted into a dedicated walk-in shower. The good news is that the plumbing is already in the wall, the drain location is set, and the alcove dimensions give you a generous shower. We remove the tub, address the subfloor, waterproof the entire space, and tile it as a proper walk-in. One note of caution: if you only have one bathtub in the house, think carefully before removing it. Appraisers and future buyers often want at least one tub, particularly in homes with three or more bedrooms.
Choosing the Right Tile for Your Shower
Tile selection is where most homeowners spend the most time (and sometimes the most stress). There are thousands of options, so let's narrow it down to what actually matters in a shower environment. The key thing to understand is that your shower walls and shower floor have different requirements, and the best tile for one isn't always the best tile for the other.
Shower Wall Tile
For walls, you have the most freedom. Water hits the walls but doesn't pool there, so slip resistance isn't a concern. What matters is water absorption rate, ease of cleaning, and aesthetics. Porcelain tile is the gold standard for shower walls—its absorption rate is under 0.5%, meaning water essentially can't penetrate the tile body. Ceramic tile works too, though it's slightly more porous. Natural stone like marble or travertine can be stunning on shower walls, but it requires sealing and more maintenance over time.
One of the strongest trends we're installing right now is large-format tile on shower walls—think 12x24, 24x48, or even full slab porcelain panels. Fewer grout lines means easier cleaning, a more seamless look, and a sense of spaciousness. If you've been browsing design inspiration online, you've probably noticed this look. It's practical and beautiful, though the installation requires precision and experience because large tiles are unforgiving of uneven walls.
We should also mention zellige tile, which has exploded in popularity. These are handmade Moroccan clay tiles with an irregular, glossy surface that catches light in a way factory tiles simply cannot. They're gorgeous as a shower accent wall or full surround, though they cost more and take longer to install because of their dimensional variations. If you love the look, they're absolutely worth it—just budget accordingly.
Shower Floor Tile
The shower floor is a completely different situation. Here, slip resistance is the primary concern. You want a tile with a textured surface or enough grout lines to provide traction when wet. This is why mosaic tiles—typically 2x2 inches or smaller—are the standard for shower floors. The dense grout line pattern acts almost like a non-slip grid. Penny round, hexagon mosaics, and pebble stone are all popular choices that look great and keep you safe. Avoid using the same large-format tile on your shower floor that you used on the walls. A smooth 12x24 porcelain tile on a shower floor is a slip hazard, full stop.
We help homeowners choose the right combination of wall and floor tile for every shower we install. If you'd like to explore options, check out our shower tile installation service for more details on what we offer.
The Waterproofing Foundation
If there's one section of this guide you read carefully, make it this one. Waterproofing is the single most critical element of any shower installation, and it's the one thing most homeowners know the least about. Here's the uncomfortable truth: tile is not waterproof. Grout is not waterproof. They are water-resistant, but over time, moisture works its way through. Without a proper waterproofing membrane behind the tile, that water reaches the framing, the drywall, the subfloor. Mold grows. Wood rots. And by the time you notice the musty smell or the soft spot in the wall, the damage can cost $5,000 to $15,000 to repair.
We've torn out dozens of showers in the Sacramento area where the tile itself looked fine but the structure behind it was destroyed. Beautiful tile over bad waterproofing (or no waterproofing at all) is a disaster waiting to happen—usually within two to three years. This is, unfortunately, where some contractors cut corners to save time and money. It's also where the difference between a $3,000 shower job and a $5,000 shower job often lives. That extra cost is going toward doing it right.
The two systems we use most often are Schluter Kerdi (a sheet membrane that bonds to the substrate and provides a waterproof layer for tile) and liquid-applied membranes like RedGard or Hydroban (which are rolled or brushed on in multiple coats). Both work extremely well when applied correctly. The Schluter system is a complete kit—membrane, drain, corners, and curb pieces all designed to work together. Liquid membranes offer more flexibility and cost less in materials, but they require careful application at the right thickness. Either way, every seam, corner, curb, drain connection, and valve penetration must be sealed. No shortcuts, no missed spots.
We include professional waterproofing in every shower installation because it's not optional—it's the foundation everything else sits on. Learn more about our approach on our waterproofing services page.
Design Features That Elevate Your Shower
Once you've chosen your layout and tile, the design features are what take a shower from functional to something you actually look forward to using. Here are the upgrades we discuss with clients most often, along with our honest take on each.
Shower Niches vs. Ledges
The built-in niche (a recessed shelf in the shower wall) has been the go-to storage solution for years, and it's still excellent. A well-placed niche keeps your shampoo and soap off the floor and within reach. Standard niches are sized to fit between wall studs (roughly 14 inches wide), though we can build custom sizes. We typically line them with the same tile as the shower or use a contrasting accent tile to make them a design feature.
That said, floating ledges and corner shelves are gaining ground as an alternative. A tile ledge is a narrow horizontal shelf—usually 4 to 6 inches deep—that runs along a section of the wall. It provides storage without cutting into the wall cavity, which means easier waterproofing and more flexibility in placement. Some homeowners are doing both: a niche at standing height and a ledge at seat level. Both approaches work well; it comes down to personal preference and how much storage you need.
Built-In Benches
A shower bench is one of those features that seems like a luxury until you have one, and then you can't imagine showering without it. It's useful for shaving legs, sitting during a long hot shower, or simply having a place to set things. We build benches from cement board or foam panels (like Kerdi-Board), waterproof them thoroughly, and tile them to match the shower. Corner benches work in tighter spaces; full-width floating benches make a statement in larger showers. The main thing to get right is the slope—the top surface must pitch slightly toward the drain so water doesn't pool on the seat.
Linear Drains
If you're building a curbless shower or just want a cleaner look, a linear drain is the way to go. Instead of the traditional center-point drain, a linear drain runs along one wall (usually the back or the entry) and collects water across a long, narrow channel. This allows the shower floor to slope in one direction instead of four, which means you can use larger floor tiles without as much concern about slope. Linear drains also look more refined and are available in a range of finishes—brushed nickel, matte black, tile-insert (where the drain grate is tiled to match the floor so it nearly disappears). They cost more than a standard drain, typically $150 to $500 for the drain body and grate, but the aesthetic upgrade is significant.
Frameless Glass
Nothing opens up a shower visually like frameless glass. Heavy-duty tempered glass panels (usually 3/8 to 1/2 inch thick) are mounted with minimal hardware, creating an unobstructed view of your tile work. Frameless glass costs more than framed enclosures, but the difference in appearance is dramatic. For doorless walk-in showers, a single fixed glass panel (a "splash panel") is often all you need. For enclosed showers, a frameless pivot or sliding door keeps the clean-line look. Budget around $800 to $2,500 for glass, depending on configuration.
Shower Lighting
Good lighting is often overlooked in shower design. A recessed LED light rated for wet locations makes a huge difference, especially in showers without much natural light. Some homeowners are adding LED strip lighting in niches or along bench edges for a subtle spa effect. If you're already opening up walls for the remodel, adding a dedicated shower light is relatively inexpensive and well worth it.
Planning a Shower Remodel?
Russell Tile designs and builds custom walk-in showers with expert waterproofing and meticulous tile work. Tell us about your project and get a free, no-pressure estimate.
Get Your Free EstimateWalk-In Shower Cost Breakdown for Sacramento
Shower remodel costs in Sacramento depend on the scope of work, materials, and complexity of your design. Here are the ranges we see most often, based on actual projects we've completed. These include demolition, waterproofing, tile, labor, and basic fixtures—but not plumbing relocation, electrical work, or glass enclosures (which are typically separate trades).
Basic Walk-In Shower: $4,000 - $7,000
Standard alcove shower with quality porcelain or ceramic tile, basic niche, standard drain, and solid waterproofing. This is a straightforward tub-to-shower conversion or a refresh of an existing stall using mid-range materials and a simple layout pattern. You're getting a beautiful, well-built shower without the premium upgrades.
Mid-Range Walk-In Shower: $7,000 - $12,000
This is where most Sacramento homeowners land. Mid-range means premium porcelain or designer tile, a linear drain, built-in niche and bench, possibly a curbless entry. The tile work may include accent walls, mixed formats (large tile on walls with mosaic on the floor), or a more complex pattern like herringbone. Waterproofing is comprehensive, and the overall design feels custom.
Luxury Walk-In Shower: $12,000 - $20,000+
Large-format or natural stone tile, curbless entry with precision floor work, tile-insert linear drain, multiple niches or floating ledges, a full bench, accent lighting, and possibly multiple showerheads. These showers are the centerpiece of the bathroom and involve the highest level of craftsmanship. Slab porcelain panels or book-matched marble push the upper end of this range.
What Affects the Price?
- Tile material cost: Ceramic at $3/sq ft vs. natural stone at $30/sq ft changes the budget significantly
- Shower size: A 30x60 alcove has roughly 50 sq ft of tile surface; a large corner shower can exceed 100 sq ft
- Pattern complexity: Herringbone, chevron, and custom patterns take more labor than a straight offset lay
- Design features: Each niche, bench, and ledge adds tile surface area and waterproofing complexity
- Demolition scope: Removing a tub and addressing the subfloor is more involved than refreshing an existing shower
- Curbless entry: Requires precision floor work and sometimes slab modifications, adding $500-$1,500
Tub-to-shower conversions specifically tend to fall in the $5,000 to $10,000 range for most Sacramento homeowners, depending on finishes and features. That includes tub removal, subfloor prep, waterproofing, tile, and a standard drain—but not the glass enclosure or plumbing fixture upgrades. For a full breakdown tailored to your project, visit our pricing page or request a free estimate.
Sacramento-Specific Considerations
Sacramento's housing stock and climate create some unique factors worth thinking about before you start your shower project.
Older Slab-on-Grade Homes
A huge number of Sacramento homes, particularly those built from the 1950s through the 1980s in neighborhoods like Land Park, Curtis Park, East Sacramento, and Arden-Arcade, are built on concrete slabs. This affects shower remodeling in a couple of ways. If you want a curbless shower, the drain needs to be recessed below the slab surface, which means cutting and modifying the concrete. It's not a dealbreaker, but it does add labor and cost compared to working above a raised floor system. Similarly, if you want to relocate plumbing (moving the drain or adding a second showerhead on a different wall), slab work may be required. We handle these projects regularly, but it's important to understand the scope upfront so there are no surprises.
Permits and Building Codes
In Sacramento County, a tile-for-tile shower remodel (replacing tile in an existing shower without changing the footprint or plumbing) typically doesn't require a permit. However, if you're converting a tub to a shower, adding a shower where one didn't exist, or making plumbing changes, a permit is usually required. The City of Sacramento and Sacramento County have slightly different requirements, so check with your local building department. A licensed contractor can help navigate this.
2026 Title 24 Code Changes
California's Title 24 building energy code continues to evolve, and the 2026 cycle includes updated requirements for bathroom ventilation and water efficiency that may affect your remodel. If you're pulling a permit for your shower project, the work will need to comply with current code, which could mean upgrading your exhaust fan or installing a WaterSense-certified showerhead. These aren't major cost additions, but they're worth knowing about in advance. Your contractor should be aware of the latest requirements and factor them into the project plan.
Sacramento's Climate Advantage
One thing working in our favor here is Sacramento's dry climate. Excessive humidity is the enemy of bathroom tile and grout, and our low average humidity (especially in summer) means your shower has a better chance of drying out between uses compared to homes in coastal or humid regions. That said, you still need proper ventilation—an exhaust fan rated for your bathroom's square footage, running for at least 20 minutes after showering. Our hot summers also mean tile stays pleasantly cool underfoot, which is a nice bonus in a shower. And unlike some flooring applications, tile in a shower doesn't experience the temperature-related expansion and contraction issues you might see in exterior applications. Sacramento's climate is genuinely kind to tile.
Russell Tile
Russell Tile is a licensed tile contractor (CSLB #941474) serving Sacramento and surrounding areas. We specialize in shower tile installation, waterproofing, and custom tile work for residential and commercial projects.
